使用iperf进行内网测速

一般的测速网站或者是常用的测速软件如speedtest通常都只能测试外网的连接的速度,但是对于在局域网内部的设备之间测速是没有办法解决的。

iperf 可以测试网络的性能,并且方便搭建,只需要命令行就可以快速对局域网进行网络性能的测试。

下载和安装

下载网站:iperf download

最简单的使用方式

再windows上打开下载的文件夹
将一台电脑作为服务端:

1
2
3
iperf3 -s
# windows
iperf3.exe -s

另外一台电脑作为客户端:

1
iperf3 -c 服务器ip

测试

服务器端新建服务器


客户端新建连接进行测速

需要注意的是在服务器端需要开启5201端口或设置其他端口,或者关闭防火墙。


Git 使用代理加速

在国内使用github最近一直都是20kb,太折腾人了. 想到使用代理加速git

1
2
3
4
5
6
7
8
9
#use proxy
git config --global http.proxy 'socks5://127.0.0.1:1080'

git config --global https.proxy 'socks5://127.0.0.1:1080'

#unuse proxy
git config --global --unset http.proxy

git config --global --unset https.proxy

Vue build后快速测试发布

Vue build后快速测试发布

最近新建了一个vue的小项目,需要再服务器上测试,但是又没有必要配置CI。
所以在


安装scp2

A pure javascript secure copy program based on ssh2.scp2 is greatly powered by ssh2, implemented the scp in a sftp way.It is written in pure javascript, and should work on every OS, even Windows. Nodejs (v0.8.7 or newer) is required to make it work.

npm install scp2 --save

使用scp2将build的文件上传到服务器

在项目根目录新建deploy.js文件

1
2
3
4
5
6
7
8
9
10
11
12
13
14
15
16
17
// ./deploy.js
const scpClient = require('scp2');

scpClient.scp('dist/',
{host: hostname,
port: port,
username: username,
password: password,
path: yourpath},
(err) => {
if(err){
console.log("发布失败");
throw err;
} else {
console.log("成功发布")
}
})

也可以在package.json中建立新的脚本
"deploy": "npm run build & node deploy.js"
就可以使用npm run deploy将工程build并上传


docker-componse搭建code-server服务

code-server is vscode running on a remote server, accessibale throught the browser.
code-server就是一个可以搭建在服务器上的远程vscode,并且我们可以直接用browser直接访问,本来的初衷是为了写blog可以直接在浏览器中写,而不是每次必须打开vscode,后来发现code-server也可以用在ipad上,兼容性还不错
参考自:https://github.com/cdr/code-server

X00

使用docker搭建code-server的优势是搭建速度比较快,但是没有办法使用宿主机的环境和配置,如果需要配置需要从头开始配置。

Docker Compose 是 Docker 官方编排(Orchestration)项目之一,负责快速的部署分布式应用。使用docker compose我们的docker命令可以复用,也可以构成更高级的配置文件。

配置

新建文件夹mkdir /usr/local/code-server 可以在任意位置,用来存放建立的新工程,打开新建的文件夹cd /usr/local/code-server,新建并编辑docker-composetouch docker-compose.yml && vim docker-compose.yml

1
2
3
4
5
6
7
8
9
10
11
12
13
version: "3"

services:
code-server:
container_name: code-server
image: codercom/code-server
ports:
- "8080:8080"
volumes:
- "/usr/local/code-server/project:/home/coder/project"
environment:
PASSWORD: <password>
restart: always
  • ports
    前面为宿主机端口可以改为需要的端口,后面为容器内端口不能更改
  • volumes
    数据卷:前面为新建的文件夹 + ‘project’
  • restart
    容器意外关闭后可以自动重启

启动容器

1
2
3
4
5
6
7
8
#在cocker-compose.yml目录下

docker-compose up ##正常启动
docker-compose up -d ##后台启动

# kill docker container
docker ps #查看对应的code-server id
docker kill <id>

ubuntu搭建GPU pytorch版本

安装显卡驱动

禁止集成的nouveau驱动

1
2
3
4
5
6
7
8
9
10
11
12
13
14
15
16
17
vim /etc/modprobe.d/blacklist.conf

#添加几行
blacklist vga16fb
blacklist nouveau
blacklist rivafb
blacklist rivatv
blacklist nvidiafb

#执行
update-initramfs -u
reboot

#重启后执行
lsmod | grep nouveau

#没有显示说明已经禁用

开始安装

1
2
3
4
5
6
7
8
9
10
11
12
#安装必要
apt-get update
apt-get install gcc g++ make -y

#按照提示进行安装
bash NVIDIA-Linux-x86_64-440.31.run

#安装后执行,可以查看gpu状态
nvidia-smi

#查看gpu的驱动版本
cat /proc/driver/nvidia/version

Anaconda

  • 下载Anaconda, 如果在国内的话建议使用国内的mirror下载, https://mirrors.tuna.tsinghua.edu.cn/anaconda/archive/ 清华镜像源的镜像,找到对应的版本进行下载.

    1
    2
    wget https://mirrors.tuna.tsinghua.edu.cn/anaconda/archive/Anaconda3-5.3.1-Linux-x86_64.sh
    bash Anaconda3-5.3.1-Linux-x86_64.sh
  • 按照提示进行安装

  • 生效环境变量

    1
    source ~/.bashrc
  • 换清华镜像源

    1
    2
    3
    4
    conda config --add channels https://mirrors.tuna.tsinghua.edu.cn/anaconda/pkgs/free/
    conda config --add channels https://mirrors.tuna.tsinghua.edu.cn/anaconda/pkgs/main/
    conda config --add channels https://mirrors.tuna.tsinghua.edu.cn/anaconda/cloud/pytorch/
    conda config --set show_channel_urls yes
  • 创建一个name为pytorh python版本为3.7的虚拟环境。

    1
    2
    3
    conda create -n pytorch python=3.7
    #切入环境
    source activate pytorch

pytroch

配置好conda环境后就,pytorch就可以顺利安装了。

此处不能按照官方进行安装conda install pytorch torchvision cudatoolkit=10.1 -c pytorch

1
2
#需要去掉-c torch后,可以从清华镜像快速下载。
conda install pytorch torchvision cudatoolkit=10.1

opencv定位十字交叉点(python)

opencv定位十字交叉点(python)

1. 主体思路

如果有更好的思路希望大佬们可以提出

要处理的图片在这里插入图片描述

  • 首先将图像进行常规处理,讲图像灰度处理后二值化
    在区域的时候发现照片中的区域很相似,但是看到图片的直方图后可以看到基本是近似的双峰,所以说可以采用Otsu’s二值化,来进行二值化,最后的结果也还可以。在这里插入图片描述
    在这里插入图片描述
  • 然后对图片进行轮廓检测使用canny()得到大概的轮廓
    在这里插入图片描述
  • 然后也就是这个程序的关键,直接使用HoughLines(),但是会取到很多的直线,可以调节阈值来取数量,但是还是会有重复的线条,最后使用一个自建函数,来清除多余的线条,讲rho和theta值比较相似或者在一定的范围内的线条归结为一条线,也可以求平均值,代码中使用的是取了一条直线,最后也就是会得到四条直线。
  • 为了求出四个交点,判断出横竖的直线,根据下面的方程联立求解,得到交点

$$ Xcos(\theta_1)+Ysin(\theta_1) = r $$

$$ Xcos(\theta_2)+Ysin(\theta_2) = r$$

1
2
3
4
5
6
a = np.array([
[np.cos(l1[1]), np.sin(l1[1])],
[np.cos(l2[1]), np.sin(l2[1])]
])
b = np.array([l1[0],l2[0]])
points.append(np.linalg.solve(a, b))

-最后的中心点也就是求平均值。标记出中心点。中心点

程序

1
2
3
4
5
6
7
8
9
10
11
12
13
14
15
16
17
18
19
20
21
22
23
24
25
26
27
28
29
30
31
32
33
34
35
36
37
38
39
40
41
42
43
44
45
46
47
48
49
50
51
52
53
54
55
56
57
58
59
60
61
62
63
64
65
66
67
68
69
70
71
72
73
74
75
76
77
78
79
80
81
82
83
84
85
86
87
import cv2
import numpy as np
import matplotlib.pyplot as plt


def cleanlines(lines):
#清除重复的线条
for lineindex, line in enumerate(lines):
if line[0]<0:
lines[lineindex][0] = -line[0]
lines[lineindex][1] = line[1]-np.pi
newlines = []
newlines.append(lines.pop(5))
for line in lines:
flag = 0
for newline in newlines:
if((abs(line[0]-newline[0])<10)&(abs(line[1]-newline[1])<0.1)):
flag = 1
if(flag==0):
newlines.append(line)
return newlines

def IntersectionPoints(lines):
#求出交点
points = []
if(len(lines)==4):
horLine = []
verLine = []
for line in lines:
if((line[1]>(0-0.1))&(line[1]<(0+0.1))):
horLine.append(line)
else:
verLine.append(line)
print(horLine)
for l1 in horLine:
for l2 in verLine:
a = np.array([
[np.cos(l1[1]), np.sin(l1[1])],
[np.cos(l2[1]), np.sin(l2[1])]
])
b = np.array([l1[0],l2[0]])
points.append(np.linalg.solve(a, b))
return points
else:
print("the number of lines error")

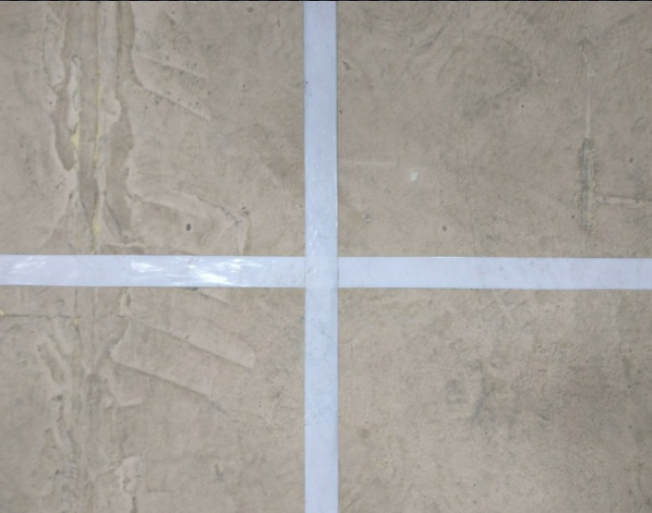
img = cv2.imread('mid.jpg')
img_gray = cv2.cvtColor(img, cv2.COLOR_BGR2GRAY)
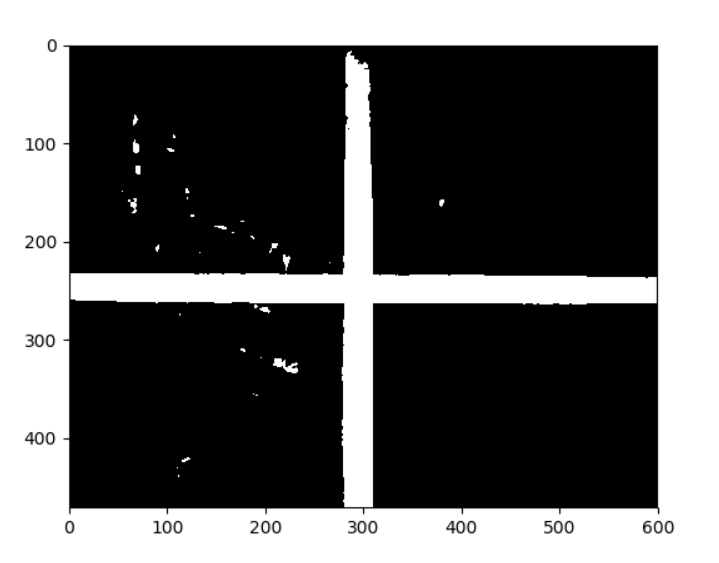
ret, im2 = cv2.threshold(img_gray, 0, 255, cv2.THRESH_BINARY+cv2.THRESH_OTSU)
#plt.imshow(img_gray,plt.cm.gray)
#plt.imshow(im2,plt.cm.gray)


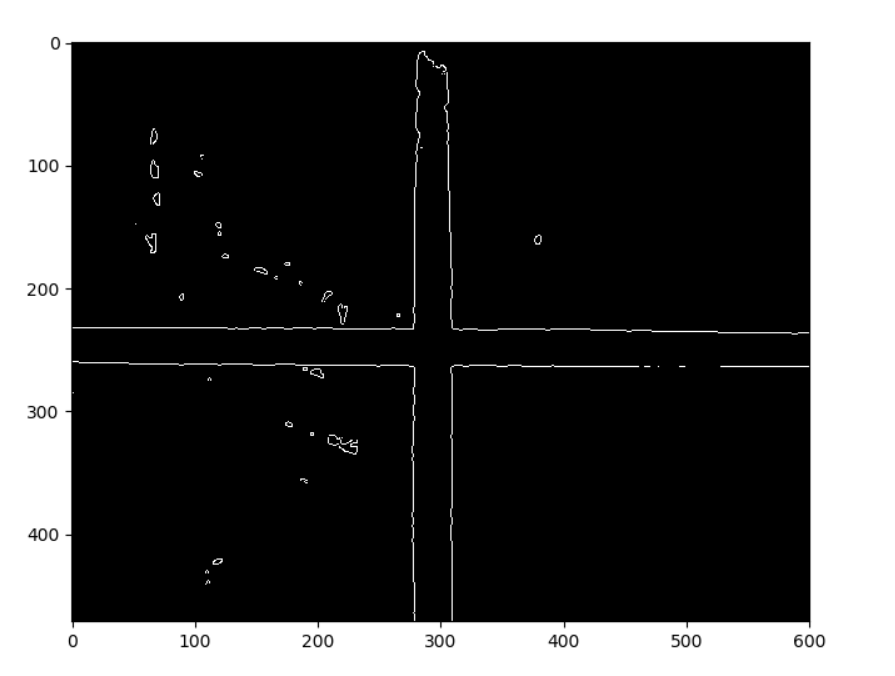
gimg = cv2.GaussianBlur(img_gray, (5, 5), 0)
gret, gim2 = cv2.threshold(gimg, 0, 255, cv2.THRESH_BINARY+cv2.THRESH_OTSU)
#plt.imshow(gim2, plt.cm.gray)
edges = cv2.Canny(gim2, 45,135)


minLineLength = 10
maxLineGap = 5
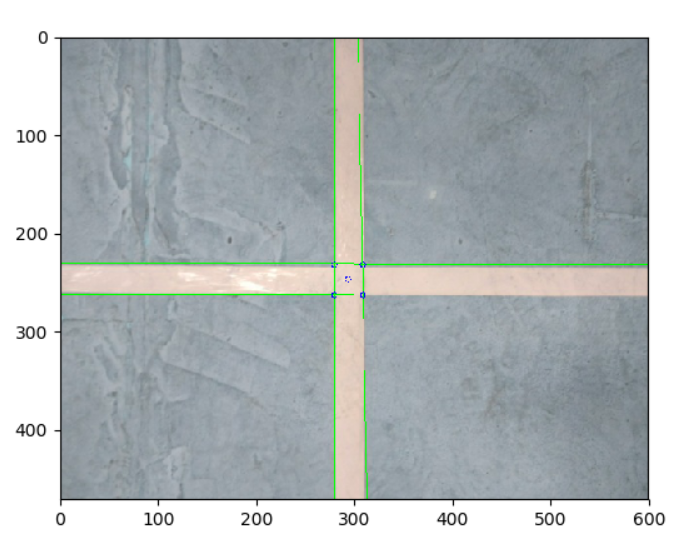
lines = cv2.HoughLines(edges, 1, np.pi/180, 120)
lines = [line[0] for line in lines.tolist()]
lines = cleanlines(lines)
points = IntersectionPoints(lines)
for line in lines:
rho, theta = line
print(rho, theta)
a = np.cos(theta)
b = np.sin(theta)
x0 = a*rho
y0 = b*rho
x1 = int(x0 + 2000*(-b))
y1 = int(y0 + 2000*(a))
x2 = int(x0 - 2000*(-b))
y2 = int(y0 - 2000*(a))
cv2.line(img,(x1, y1), (x2, y2), (0, 255, 0), 1)


for point in points:
cv2.circle(img, (int(point[0]),int(point[1])), 3, (0,0,255))
midx = np.mean([point[0] for point in points])
midy = np.mean([point[1] for point in points])
cv2.circle(img, (int(midx), int(midy)), 3, (0,0,255))
plt.figure()
plt.imshow(img)
plt.show()

深度学习Q-learing算法实现

深度学习Q-learing算法实现

1. 问题分析

在这里插入图片描述

这是一个走悬崖的问题。强化学习中的主体从S出发走到G处一个回合结束,除了在边缘以外都有上下左右四个行动,如果主体走入悬崖区域,回报为-100,走入中间三个圆圈中的任一个,会得到-1的奖励,走入其他所有的位置,回报都为-5。

这是一个经典的Q-learing问题走悬崖的问题,也就是让我们选择的最大利益的路径,可以将图片转化为reward矩阵

1
2
3
4
[[  -5.   -5.   -5.   -5.   -5.   -5.   -5.   -5.   -5.   -5.   -5.   -5.]
[ -5. -5. -5. -5. -5. -1. -1. -1. -5. -5. -5. -5.]
[ -5. -5. -5. -5. -5. -5. -5. -5. -5. -5. -5. -5.]
[ -5. -100. -100. -100. -100. -100. -100. -100. -100. -100. -100. 100.]]

我们的目标就是让agent从s(3,0)到达g(3,11)寻找之间利益最大化的路径,学习最优的策略。

2. Q—learing理论分析

在Q-learing算法中有两个特别重要的术语:状态(state),行为(action),在我们这个题目中,state对应的就是我们的agent在悬崖地图中所处的位置,action也就是agent下一步的活动,我的设定是(0, 1 ,2,3,4)对应的为(原地不动,上,下,左,右),需要注意的事我们的next action是随机的但是也是取决于目前的状态(current state)。

我们的核心为Q-learing的转移规则(transition rule),我们依靠这个规则去不断地学习,并把agent学习的经验都储存在Q-stable,并不断迭代去不断地积累经验,最后到达我们设定的目标,这样一个不断试错,学习的过程,最后到达目标的过程为一个episode
$$Q(s,a) = R(s,a)+\gamma *max \lbrace Q(\tilde{s},\tilde{a}) \rbrace $$
其中$s,a$表示现在状态的state和action,$\tilde{s},\tilde{a}$表示下一个状态的state和action,学习参数为$0<\gamma<1$,越接近1代表约考虑远期结果。
在Q-table初始化时由于agent对于周围的环境一无所知,所以初始化为零矩阵。

3. 算法实现

参考以下伪代码:
在这里插入图片描述
具体程序如见附录
程序的关键点:

  1. 核心代码即为伪代码,但是各种方法需要自己实现,在程序中有注释可以参考
  2. 需要判断agent在一个状态下可以使用的行动,这一点我用valid_action(self, current_state)实现

发现的问题:题目中的目标点为G 的目标值也是为-1,但是程序会走到这个一步但是函数没有收敛到此处,而且由于在奖励点收益大,所以最后的agent会收敛到奖励点处,在三个奖励点处来回移动。所有我将最后的目标点G的值改为了100,函数可以收敛到此处。后来也看到文献中的吸收目标

3. 结果展示

最后到Q-tabel矩阵由于太大放到附录查看,但是同时为了更加直观的看到运行结果,
编写了动态绘图的程序 画出了所有的路径。如果需要查看动态图片请运行程序最终结果如下图:
在这里插入图片描述
从图中可以看到agent避过了所有的悬崖,而且收获了所有的奖励最终到达目标。

4.附录

程序:

1
2
3
4
5
6
7
8
9
10
11
12
13
14
15
16
17
18
19
20
21
22
23
24
25
26
27
28
29
30
31
32
33
34
35
36
37
38
39
40
41
42
43
44
45
46
47
48
49
50
51
52
53
54
55
56
57
58
59
60
61
62
63
64
65
66
67
68
69
70
71
72
73
74
75
76
77
78
79
80
81
82
83
84
85
86
87
88
89
90
91
92
93
94
95
96
97
98
99
100
101
102
103
104
105
106
107
108
109
110
111
#-*- utf-8 -*-
# qvkang
import numpy as np
import random
import turtle as t
class Cliff(object):
def __init__(self):
self.reward = self._reward_init()
print(self.reward)
self.row = 4
self.col = 12
self.gamma = 0.7
self.start_state = (3, 0)
self.end_state = (3, 11)
self.q_matrix = np.zeros((4,12,5))
self.main()

def _reward_init(self):
re = np.ones((4,12))*-5
# 奖励
re[1][5:8] = np.ones((3))*-1
# 悬崖
re[3][1:11] = np.ones((10))*-100
#目标
re[3][11] = 100
return re

def valid_action(self, current_state):
# 判断当前状态下可以走的方向
itemrow, itemcol = current_state
valid = [0]
if(itemrow-1 >= 0): valid.append(1)
if(itemrow+1 <= self.row-1):valid.append(2)
if(itemcol-1 >= 0): valid.append(3)
if(itemcol+1 <= self.col-1): valid.append(4)
return valid

def transition(self, current_state, action):
# 从当前状态转移到下一个状态
itemrow, itemcol = current_state
if (action is 0): next_state = current_state
if (action is 1): next_state = (itemrow-1, itemcol)
if (action is 2): next_state = (itemrow+1, itemcol)
if (action is 3): next_state = (itemrow, itemcol-1)
if (action is 4): next_state = (itemrow, itemcol+1)
return(next_state)
def _indextoPosition(self,index):
index += 1
itemrow = int(np.floor(index/self.col))
itemcol = index%self.col
return(itemrow, itemcol)

def _positiontoIndex(self,itemrow,itemcol):
itemindex = (itemrow)*self.col+itemcol-1
return itemindex

def getreward(self, current_state, action):
# 得到下一步的奖励
next_state = self.transition(current_state, action)
next_row, next_col = next_state
r = self.reward[next_row, next_col]
return r
def path(self):
#绘图path 使用turtle的绘图库
t.speed(10)
t.begin_fill()
paths = []
current_state = self.start_state
t.pensize(5)
t.penup()
t.goto(current_state)
t.pendown()
#移动到初始位置
paths.append(current_state)
while current_state != self.end_state:
current_row, current_col = current_state
valid_action = self.valid_action(current_state)
valid_value = [self.q_matrix[current_row][current_col][x] for x in valid_action]
max_value = max(valid_value)
action = np.where(self.q_matrix[current_row][current_col] == max_value)
print(current_state,'-------------',action)
next_state = self.transition(current_state,int(random.choice(action[0])))
paths.append(next_state)
next_row,next_col = next_state
t.goto(next_col*20, 60-next_row*20)
current_state = next_state

def main(self):
#主要循环迭代
for i in range(1000):
current_state = self.start_state
while current_state != self.end_state:
action = random.choice(self.valid_action(current_state))
next_state = self.transition(current_state, action)
future_rewards = []
for action_next in self.valid_action(next_state):
next_row, next_col = next_state
future_rewards.append(self.q_matrix[next_row][next_col][action_next])
#core trasmite rule
q_state = self.getreward(current_state, action) + self.gamma*max(future_rewards)
current_row, current_col = current_state
self.q_matrix[current_row][current_col][action] = q_state
current_state = next_state
#print(self.q_matrix)
#绘图1000次
for i in range(1000):
self.path()
print(self.q_matrix)

if __name__ == "__main__":
Cliff()

Q-table矩阵最终结果:

1
2
3
4
5
6
7
8
9
10
11
12
13
14
15
16
17
18
19
20
21
22
23
24
25
26
27
28
29
30
31
32
33
34
35
36
37
38
39
40
41
42
43
44
45
46
47
48
49
50
51
[[[ -14.84480118    0.          -14.06400168    0.          -14.06400168]
[ -14.06400168 0. -12.94857383 -14.84480118 -12.94857383]
[ -12.94857383 0. -11.35510547 -14.06400168 -11.35510547]
[ -11.35510547 0. -9.07872209 -12.94857383 -9.07872209]
[ -9.07872209 0. -5.82674585 -11.35510547 -5.82674585]
[ -5.82674585 0. -1.1810655 -9.07872209 -5.1810655 ]
[ -5.1810655 0. -0.258665 -5.82674585 -4.258665 ]
[ -4.258665 0. 1.05905 -5.1810655 -2.94095 ]
[ -2.94095 0. 2.9415 -4.258665 2.9415 ]
[ 2.9415 0. 11.345 -2.94095 11.345 ]
[ 11.345 0. 23.35 2.9415 23.35 ]
[ 23.35 0. 40.5 11.345 0. ]]

[[ -14.06400168 -14.84480118 -14.84480118 0. -12.94857383]
[ -12.94857383 -14.06400168 -14.06400168 -14.06400168 -11.35510547]
[ -11.35510547 -12.94857383 -12.94857383 -12.94857383 -9.07872209]
[ -9.07872209 -11.35510547 -11.35510547 -11.35510547 -5.82674585]
[ -5.82674585 -9.07872209 -9.07872209 -9.07872209 -1.1810655 ]
[ -1.1810655 -5.82674585 -5.82674585 -5.82674585 -0.258665 ]
[ -0.258665 -5.1810655 -2.94095 -1.1810655 1.05905 ]
[ 1.05905 -4.258665 2.9415 -0.258665 2.9415 ]
[ 2.9415 -2.94095 11.345 1.05905 11.345 ]
[ 11.345 2.9415 23.35 2.9415 23.35 ]
[ 23.35 11.345 40.5 11.345 40.5 ]
[ 40.5 23.35 65. 23.35 0. ]]

[[ -14.84480118 -14.06400168 -15.39136082 0. -14.06400168]
[ -14.06400168 -12.94857383 -109.84480118 -14.84480118 -12.94857383]
[ -12.94857383 -11.35510547 -109.06400168 -14.06400168 -11.35510547]
[ -11.35510547 -9.07872209 -107.94857383 -12.94857383 -9.07872209]
[ -9.07872209 -5.82674585 -106.35510547 -11.35510547 -5.82674585]
[ -5.82674585 -1.1810655 -104.0787221 -9.07872209 -2.94095 ]
[ -2.94095 -0.258665 -102.058665 -5.82674585 2.9415 ]
[ 2.9415 1.05905 -97.94095 -2.94095 11.345 ]
[ 11.345 2.9415 -92.0585 2.9415 23.35 ]
[ 23.35 11.345 -83.655 11.345 40.5 ]
[ 40.5 23.35 -30. 23.35 65. ]
[ 65. 40.5 100. 40.5 0. ]]

[[ -15.39136082 -14.84480118 0. 0. -109.84480118]
[-109.84480118 -14.06400168 0. -15.39136082 -109.06400168]
[-109.06400168 -12.94857383 0. -109.84480118 -107.94857383]
[-107.94857383 -11.35510547 0. -109.06400168 -106.35510547]
[-106.35510547 -9.07872209 0. -107.94857383 -104.0787221 ]
[-104.0787221 -5.82674585 0. -106.35510547 -102.058665 ]
[-102.058665 -2.94095 0. -104.0787221 -97.94095 ]
[ -97.94095 2.9415 0. -102.058665 -92.0585 ]
[ -92.0585 11.345 0. -97.94095 -83.655 ]
[ -83.655 23.35 0. -92.0585 -30. ]
[ -30. 40.5 0. -83.655 100. ]
[ 0. 0. 0. 0. 0. ]]]

nextcloud配置优化和常见问题(FAQ)

FAQ:

  1. 设置cron后台任务
    使用nginx用户进行定时任务启动(为了优化性能, 正确配置后台任务非常重要. 对于较大的实例, 推荐配置为 ‘Cron’. 详情请参考相关文档.)
1
2
3
4
5
6
7
8
9
10
11
12
13
14
15
16
17
vim   /etc/crontab

SHELL=/bin/bash
PATH=/sbin:/bin:/usr/sbin:/usr/bin
MAILTO=root

# For details see man 4 crontabs

# Example of job definition:
# .---------------- minute (0 - 59)
# | .------------- hour (0 - 23)
# | | .---------- day of month (1 - 31)
# | | | .------- month (1 - 12) OR jan,feb,mar,apr ...
# | | | | .---- day of week (0 - 6) (Sunday=0 or 7) OR sun,mon,tue,wed,thu,fri,sat
# | | | | |
# * * * * * user-name command to be executed
*/15 * * * * nginx php -f /var/www/nextcloud/cron.php

重启crond

systemctl restart crond

  1. 日志出现错误ERROR:you are using a fallback implementation of the intl extension
    由于没有安装init模块
1
2
3
yum install php7.1w-init
systemctl restart php-fpm
systemctl restart nginx

需要注意的是php应该对应自已的版本,nginx对应的是自己的服务器

  1. 提示没有配置好opcache.ini
1
2
3
4
5
6
7
8
9
10
vim /etc/php.d/opcache.ini
修改/etc/php.d/opcache.ini,将以下行注释去掉,并修改为对应的配置值
zend_extension=opcache.so
opcache.enable=1
opcache.enable_cli=1
opcache.memory_consumption=128
opcache.interned_strings_buffer=8
opcache.max_accelerated_files=10000
opcache.revalidate_freq=1
opcache.save_comments=1
  1. 登陆无限启动的问题
    首先检查php-fpm最顶端的设置 user和group,/etc/php-fpm.d/www.conf
    设置php的session的储存目录的所有者
1
chown nginx:nginx /var/lib/php/session/

实在没办法的话,可以试试

1
chmod -R 777 /var/lib/php/session/

最后一定要记得清除浏览器的cookies