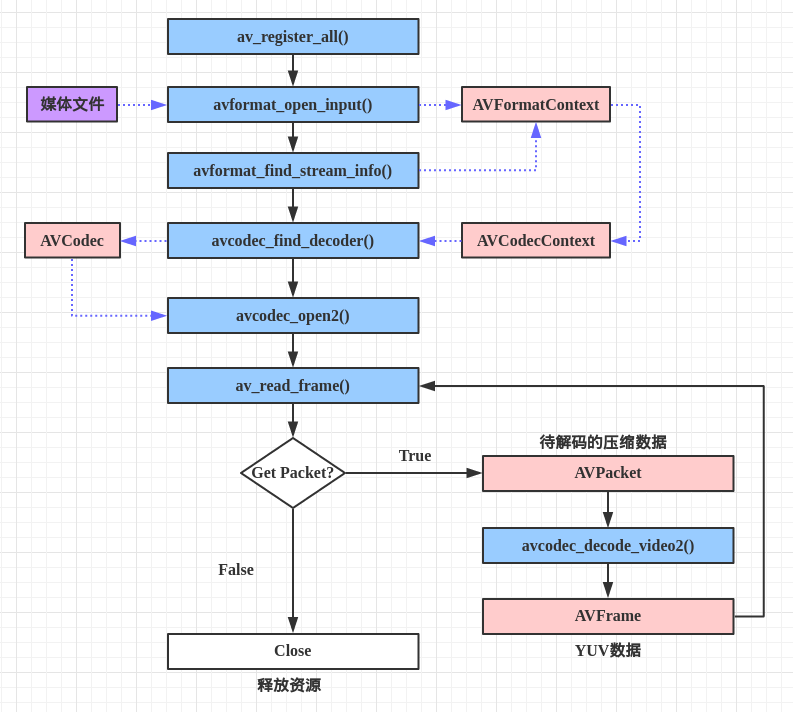
nodejs搭建mqtt服务器(Broker)

MQTT通讯协议

MQTT(消息队列遥测传输)是一种开放式OASIS和ISO标准的轻量级发布订阅网络协议,可在设备之间传输消息,是当下使用广泛的物联网通信协议之一。

IBM公司开发了MQTT协议的第一个版本, 设计思想是轻巧、开放、简单、规范,易于实现。
这些特点使得它对很多场景来说都是很好的选择,特别是对于受限的环境如机器与机器的通信(M2M)以及物联网环境(IoT)。

图中包括了MQTT协议中的两个角色和基本的订阅和发布模式

  • broker/client

    broker为代理端也就是我们要搭建的服务器,client也就是每个终端温度传感器或者是电脑笔记本等

  • 发布/订阅

    手机或者电脑client向broker订阅一个temp topic,当温度传感器client发布一个temp topic则手机或者电脑同时可以接收到订阅的内容

搭建mqtt Broker

mqtt Broker使用aedes进行搭建

1
2
3
4
5
6
7
const aedes = require('aedes')()
const server = require('net').createServer(aedes.handle)
const port = 18080

server.listen(port, function () {
console.log('server started and listening on port ', port)
})

测试mqtt Broker

搭建两个客户端进行模拟,每隔一秒发送一次temp。客户端使用mqtt.js

  1. client_pub.js
    1
    2
    3
    4
    5
    6
    7
    8
    9
    10
    11
    var mqtt = require("mqtt")
    var client = mqtt.connect("mqtt://localhost:18080")

    // 连接后不断发布temp topic
    client.on("connect", (e) => {
    console.log("success connect mqtt server");
    setInterval(() => {
    client.publish("temp", "25.6")
    console.log("send it")
    }, 1000)
    })
  2. client_sub.js
    1
    2
    3
    4
    5
    6
    7
    8
    9
    10
    11
    12
    13
    14
    15
    16
    var mqtt = require("mqtt")
    var client = mqtt.connect("mqtt://localhost:18080")

    // 连接后订阅temp topic
    client.on('connect', (e) => {
    console.log("success connect mqtt server");
    client.subscribe('temp', function (err) {
    console.log("subscribe temp topic")
    })
    })

    // 监听订阅的message
    client.on('message', function (topic, message) {
    // message is Buffer
    console.log(topic + ":\t" + message.toString())
    })

启动服务后运行两个客户端得到以下结果:

  1. 服务器
    1
    server started and listening on port  18080
  2. 客户端
    1
    2
    3
    4
    5
    6
    7
    8
    9
    10
    11
    12
    13
    14
    15
    16
    17
    18
    19
    20
    21
    22
    23
    24
    25
    # node mqtt-pub.js 
    success connect mqtt server
    send it
    send it
    send it
    send it
    send it
    send it
    send it
    send it
    send it
    send it
    send it

    # node mqtt-sub.js
    success connect mqtt server
    subscribe temp topic
    temp: 25.6
    temp: 25.6
    temp: 25.6
    temp: 25.6
    temp: 25.6
    temp: 25.6
    temp: 25.6
    temp: 25.6

使用ffmpeg生成视频缩略图

整个项目在https://github.com/ximikang/ffmpegThumbnail发布

生成缩略图的步骤

  1. 使用ffmpeg解码视频
  2. 帧格式转换
  3. 根据缩略图的数量从视频流中取帧
  4. 使用opencv建立画布并生成缩略图

ffmpeg解码视频

根据缩略图的数量从视频流中取帧

  1. 获取图片之间的时间间隔
    1
    2
    3
    4
    5
    6
    7
    8
    9
    10
    11
    12
    13
    14
    15
    16
    17
    // Read media file and read the header information from container format
    AVFormatContext* pFormatContext = avformat_alloc_context();
    if (!pFormatContext) {
    logging("ERROR could not allocate memory for format context");
    return -1;
    }

    if (avformat_open_input(&pFormatContext, inputFilePath.string().c_str(), NULL, NULL) != 0) {
    logging("ERROR could not open media file");
    }

    logging("format %s, duration %lld us, bit_rate %lld", pFormatContext->iformat->name, pFormatContext->duration, pFormatContext->bit_rate);
    cout << "视频时常:" << pFormatContext->duration / 1000.0 / 1000.0 << "s" << endl;
    int64_t video_duration = pFormatContext->duration;
    int sum_count = rowNums * colNums;
    //跳转的间隔 ms
    int64_t time_step = video_duration / sum_count / 1000;
  2. 设置跳转时间获取不同的视频Packet
    1
    2
    3
    4
    5
    6
    7
    8
    9
    10
    11
    12
    13
    14
    15
    16
    for (int i = 0; i < sum_count ; ++i) {
    cv::Mat tempImage;
    // 每次读取相同时间间隔的图像并存入vImage中
    while (av_read_frame(pFormatContext, pPacket) >= 0) {
    if (pPacket->stream_index == video_stream_index) {
    response = decode_packet_2mat(pPacket, pCodecContext, pFrame, tempImage);// 返回
    }
    if (response == 0)// 成功读取一帧
    break;
    if (response < 0)
    continue;
    }
    vImage.push_back(tempImage);
    // 跳转视频
    av_seek_frame(pFormatContext, -1, ((double)time_step / (double)1000)* AV_TIME_BASE*(double)(i+1) + (double)pFormatContext->start_time, AVSEEK_FLAG_BACKWARD);
    }
  3. 获取Frame
    在固定的时间点可能无法获取从当前时间点的Packet获取对应的Frame,所以需要对获取的Packet进行判断,如果没有获取到对应的Frame应该继续获取下一Packet直到获取到对应的Frame为止。
    1
    2
    3
    4
    5
    6
    7
    8
    9
    10
    11
    12
    13
    14
    15
    16
    17
    18
    19
    20
    21
    22
    23
    24
    25
    26
    27
    static int decode_packet_2mat(AVPacket* pPacket, AVCodecContext* pCodecContext, AVFrame* pFrame, cv::Mat& image) {
    int response = avcodec_send_packet(pCodecContext, pPacket);

    if (response < 0) {
    logging("Error while sending a packet to the decoder");
    return response;
    }

    while (response >= 0) {
    // return decoded out data from a decoder
    response = avcodec_receive_frame(pCodecContext, pFrame);
    if (response == AVERROR(EAGAIN) || response == AVERROR_EOF) {
    logging("averror averror_eof");
    break;
    }
    else if (response < 0) {
    logging("Error while receiving frame");
    return response;
    }

    if (response >= 0) {
    // 获取到Frame
    image = frame2Mat(pFrame, pCodecContext->pix_fmt);
    }
    return 0;
    }
    }

    帧格式转换

    由于从视频流获取的帧是YUV格式的Frame格式,后面使用opencv进行操作所以进行格式转换。

先使用ffmpeg中的SwsContext将从视频中抽取到的帧从YUV转换到BGR格式,再从BGRFrame中的内存中获取原始数据,并转换到opencv的Mat类型。

1
2
3
4
5
6
7
8
9
10
11
12
13
14
15
16
17
18
19
20
21
22
23
cv::Mat frame2Mat(AVFrame* pFrame, AVPixelFormat pPixFormat)
{
// image init
AVFrame* pRGBFrame = av_frame_alloc();
uint8_t* out_buffer = new uint8_t[avpicture_get_size(AV_PIX_FMT_BGR24, pFrame->width, pFrame->height)];
avpicture_fill((AVPicture*)pRGBFrame, out_buffer, AV_PIX_FMT_BGR24, pFrame->width, pFrame->height);
SwsContext* rgbSwsContext = sws_getContext(pFrame->width, pFrame->height, pPixFormat, pFrame->width, pFrame->height, AV_PIX_FMT_BGR24,SWS_BICUBIC, NULL, NULL, NULL);
if (!rgbSwsContext) {
logging("Error could not create frame to rgbframe sws context");
exit(-1);
}
if (sws_scale(rgbSwsContext, pFrame->data, pFrame->linesize, 0, pFrame->height, pRGBFrame->data, pRGBFrame->linesize) < 0) {
logging("Error could not sws to rgb frame");
exit(-1);
}

cv::Mat mRGB(cv::Size(pFrame->width, pFrame->height), CV_8UC3);
mRGB.data = (uchar*)pRGBFrame->data[0];//注意不能写为:(uchar*)pFrameBGR->data

av_free(pRGBFrame);
sws_freeContext(rgbSwsContext);
return mRGB;
}

使用opencv建立画布并生成缩略图

通过画布需要的大小参数,画出白色画布,再对画布进行填充。

1
2
3
4
5
6
7
8
9
10
11
12
13
14
15
16
17
18
19
20
21
22
23
24
25
26
cv::Mat makeThumbnail(vector<cv::Mat> vImage, const unsigned int rowNums, const unsigned int colNums)
{
// 判断图片时候满足条件
if (vImage.size() != rowNums * colNums) {
logging("Error image size not equal input size");
logging("vImage length: %d, rowNums: %d, col number: %d", vImage.size(), rowNums, colNums);
exit(-1);
}
int interval = 100;
int height = vImage[0].size().height * rowNums + interval * (rowNums + 1);
int width = vImage[0].size().width * colNums + interval * (colNums + 1);
logging("thumbnail size: %d * %d", height, width);
cv::Mat thumbnail(cv::Size(width, height), CV_8UC3);
thumbnail.setTo(255);

// 进行填充
for (int i = 0; i < rowNums; ++i) {
for (int j = 0; j < colNums; ++j) {
int no = i * rowNums + j;
int widthOffset = (vImage[0].size().width + interval) * j + interval;
int heightOffset = (vImage[0].size().height + interval) * i + interval;
vImage[no].copyTo(thumbnail(cv::Rect(widthOffset, heightOffset, vImage[0].size().width, vImage[0].size().height)));
}
}
return thumbnail;
}

最后的效果


多进程双buffer读取并处理

题目要求

编写Linux平台下的两个C语言程序实现如下功能:
(1)X、Y两个进程相互配合实现对输入文件中数据的处理,并将处理结果写入输出文件。
(2)X进程负责读分块取输入文件,并将输入数据利用共享内存传输给Y进程。
(3)Y进程负责将读入的数据(假定皆为文本数据)全部处理成大写,然后写入输出文件。
(4)为提高并行效率,X、Y两个进程之间创建2个共享内存区A、B。X读入数据到A区,然后用Linux的信号或信号量机制通知Y进程进行处理;在Y处理A区数据时,X继续读入数据到B区;B区数据被填满之后,X进程通知Y进程处理,自己再继续向A区读入数据。如此循环直至全部数据处理完毕。

解题

1
2
3
4
5
6
7
8
9
10
11
12
13
14
15
16
17
18
19
20
21
22
23
24
25
26
27
28
29
30
31
32
33
34
35
36
37
38
39
40
41
42
43
44
45
46
47
48
49
50
51
52
53
54
55
56
57
58
59
60
61
62
63
64
65
66
67
68
69
70
71
72
73
74
75
76
77
78
79
80
81
82
83
84
85
86
87
88
89
90
91
92
93
94
95
96
97
98
99
100
101
102
103
104
105
106
107
108
109
110
111
112
113
114
115
116
117
118
119
120
121
122
123
124
125
126
127
128
129
130
131
132
133
134
135
136
137
138
139
140
#include <stdio.h>
#include <unistd.h>
#include <sys/types.h>
#include <sys/stat.h>
#include <fcntl.h>
#include <ctype.h>
#include <semaphore.h>
#include <sys/ipc.h>
#include <sys/shm.h>

const int BUFFER_SIZE = 2048;

int main(int argc, char const *argv[])
{
argv[1];
// 文件
int inputFile, outputFile;
inputFile = open(argv[1], O_RDONLY);
if(inputFile <= 0 ){
printf("no file %s \n", argv[1]);
return 0;
}
outputFile = open("./output.txt", O_WRONLY | O_CREAT, 0666);

// 信号量
sem_t *sem1;
sem_t *sem2;
sem1 = sem_open("sem1", O_CREAT, 0666, 1);
sem2 = sem_open("sem2", O_CREAT, 0666, 0);

// 共享内存
// 定义交换空间结构体
struct switchBuffer
{
char buffer[BUFFER_SIZE];
int flag;
};
struct switchBuffer *buffera; // 交换空间a,b
struct switchBuffer *bufferb;
int shmaId, shmbId;

// 创建共享内存
shmaId = shmget((key_t)11, sizeof(buffera), 0666 | IPC_CREAT);
shmbId = shmget((key_t)22, sizeof(bufferb), 0666 | IPC_CREAT);

// 主进程读取数据
// 子进程处理后写入数据
pid_t cpid;
cpid = fork();
if (cpid < 0)
{
printf("error in fork\n");
}
else if (cpid == 0)
{
// 子进程
printf("child process pid: %d \t", getpid());

// 共享内存映射到进程空间
buffera = (struct switchBuffer *)shmat(shmaId, 0, 0);
bufferb = (struct switchBuffer *)shmat(shmbId, 0, 0);
int switchFlag = 1;
while(1)
{
sem_wait(sem2);
if (switchFlag)
{
for (int i = 0; i < buffera->flag; ++i)
{
buffera->buffer[i] = toupper(buffera->buffer[i]);
}
write(outputFile, buffera->buffer, buffera->flag);
}
else
{
for (int i = 0; i < bufferb->flag; ++i)
{
bufferb->buffer[i] = toupper(bufferb->buffer[i]);
}
write(outputFile, bufferb->buffer, bufferb->flag);
}
switchFlag = !switchFlag;
sem_post(sem1);
}
}
else
{
// 主进程
// 共享内存映射到进程空间
buffera = (struct switchBuffer *)shmat(shmaId, 0, 0);
bufferb = (struct switchBuffer *)shmat(shmbId, 0, 0);

int fileFlag = 0;
int switchFlag = 1;

// 1.读取文件->buffer a
// 2.等待处理进程
// 3.触发处理进程
// 4.读取文件->buffer b
// 5.等待处理进程
// 6.触发处理进程

// 开始时预先触发2,开始运行任务
// 通过read文件为0判断终止条件
// 终止后再次等待处理线程处理最后的一个buffer
while (1)
{
if (switchFlag)
{
fileFlag = read(inputFile, buffera->buffer, BUFFER_SIZE);
buffera->flag = fileFlag;
}
else
{
fileFlag = read(inputFile, bufferb->buffer, BUFFER_SIZE);
bufferb->flag = fileFlag;
}
switchFlag = !switchFlag;
if (fileFlag <= 0)
break;
sem_wait(sem1);
sem_post(sem2);
}
sem_wait(sem1);
}

// destory
close(inputFile);
close(outputFile);
sem_close(sem1);
sem_close(sem2);
sem_unlink("sem1");
sem_unlink("sem2");
shmdt(buffera);
shmdt(bufferb);
shmctl(shmaId, IPC_RMID, 0);
shmctl(shmbId, IPC_RMID, 0);
printf("over\n");
return 0;
}

使用OpenCV抠图

颜色空间

颜色空间是对颜色的一种表述,但是颜色本来就是客观存在的,不同的颜色空间只是通过不同的角度去衡量同一个颜色。常见的颜色空间主要有基于颜色的还有亮度分离的颜色空间。

RGB颜色空间

HSV颜色空间

抠图需要的颜色空间


realsense深度图像读取对齐与保存

图像采集

realsense直接读取出来的彩色图片和深度图片是没有对齐的,读取出来的两张图片像素之间没有一一对应。但是一般使用两张图片是需要对齐的,并且直接利用深度信息。

以下程序为了更加方便的采集数据。
程序运行后q退出,s保存图片。

1
2
3
4
5
6
7
8
9
10
11
12
13
14
15
16
17
18
19
20
21
22
23
24
25
26
27
28
29
30
31
32
33
34
35
36
37
38
39
40
41
42
43
44
45
46
47
48
49
50
51
52
53
54
55
56
57
58
59
60
61
62
63
64
65
66
67
68
69
70
71
72
73
import pyrealsense2 as rs
import numpy as np
import cv2
import time
import os

pipeline = rs.pipeline()

#Create a config并配置要流​​式传输的管道
config = rs.config()
config.enable_stream(rs.stream.depth, 640, 480, rs.format.z16, 30)
config.enable_stream(rs.stream.color, 640, 480, rs.format.bgr8, 30)

profile = pipeline.start(config)

depth_sensor = profile.get_device().first_depth_sensor()
depth_scale = depth_sensor.get_depth_scale()
print("Depth Scale is: " , depth_scale)

align_to = rs.stream.color
align = rs.align(align_to)

# 按照日期创建文件夹
save_path = os.path.join(os.getcwd(), "out", time.strftime("%Y_%m_%d_%H_%M_%S", time.localtime()))
os.mkdir(save_path)
os.mkdir(os.path.join(save_path, "color"))
os.mkdir(os.path.join(save_path, "depth"))

# 保存的图片和实时的图片界面
cv2.namedWindow("live", cv2.WINDOW_AUTOSIZE)
cv2.namedWindow("save", cv2.WINDOW_AUTOSIZE)
saved_color_image = None # 保存的临时图片
saved_depth_mapped_image = None
saved_count = 0

# 主循环
try:
while True:
frames = pipeline.wait_for_frames()

aligned_frames = align.process(frames)

aligned_depth_frame = aligned_frames.get_depth_frame()
color_frame = aligned_frames.get_color_frame()

if not aligned_depth_frame or not color_frame:
continue

depth_data = np.asanyarray(aligned_depth_frame.get_data(), dtype="float16")
depth_image = np.asanyarray(aligned_depth_frame.get_data())
color_image = np.asanyarray(color_frame.get_data())
depth_mapped_image = cv2.applyColorMap(cv2.convertScaleAbs(depth_image, alpha=0.03), cv2.COLORMAP_JET)
cv2.imshow("live", np.hstack((color_image, depth_mapped_image)))
key = cv2.waitKey(30)

# s 保存图片
if key & 0xFF == ord('s'):
saved_color_image = color_image
saved_depth_mapped_image = depth_mapped_image

# 彩色图片保存为png格式
cv2.imwrite(os.path.join((save_path), "color", "{}.png".format(saved_count)), saved_color_image)
# 深度信息由采集到的float16直接保存为npy格式
np.save(os.path.join((save_path), "depth", "{}".format(saved_count)), depth_data)
saved_count+=1
cv2.imshow("save", np.hstack((saved_color_image, saved_depth_mapped_image)))

# q 退出
if key & 0xFF == ord('q') or key == 27:
cv2.destroyAllWindows()
break
finally:
pipeline.stop()

保存后的图像读取

1
2
3
4
5
6
7
8
9
10
11
12
13
14
15
16
import cv2
import numpy as np
import matplotlib.pyplot as plt

if __name__ == "__main__":
color_image = cv2.imread("./0.png")
depth_image = np.load("./0.npy")

cv2.imshow("color", color_image)

# 读取到的深度信息/1000 为真实的深度信息,单位为m
# truth_depth = depth_image[x, y]/1000
# 如果深度信息为0, 则说明没有获取到
plt.imshow(depth_image.astype(np.int), "gray")
plt.show()
cv2.waitKey()

windows下nginx搭建文件服务器附带基本验证功能

windows下nginx搭建文件服务器附带基本验证功能

配置nginx

在nginx的配置文件中添加如下配置文件

1
2
3
4
5
6
7
8
9
10
11
12
13
14
15
16
server {
listen 7777 default_server;
listen [::]:7777 default_server;

location / {
# 文件目录
alias D:/share;
# 基本验证
auth_basic "nginx basic auth";
auth_basic_user_file C:/nginx/conf/htpasswd;
# 文件显示功能
autoindex on; #开启索引功能
autoindex_exact_size off; #关闭计算文件确切大小(单位bytes),只显示大概大小(单位kb、mb、gb)
autoindex_localtime on; #显示本机时间而非 GMT 时间
}
}

新建用户文件

在C:/nginx/conf中新建htpasswd文件,按照如下的排列方式新建用户

1
username:password

reload nginx

1
nginx.exe -s reload

在网站上输入账户和密码即可以访问文件服务


ORBslam2安装中的问题和报错

安装中出现的报错问题以及解决方案

无法找到lib

  • 报错信息

    1
    2
    3
    4
    5
    6
    7
    8
    make[1]: *** Waiting for unfinished jobs....
    collect2: error: ld returned 1 exit status
    CMakeFiles/Stereo.dir/build.make:203: recipe for target '../Stereo' failed
    make[2]: *** [../Stereo] Error 1
    CMakeFiles/Makefile2:104: recipe for target 'CMakeFiles/Stereo.dir/all' failed
    make[1]: *** [CMakeFiles/Stereo.dir/all] Error 2
    Makefile:129: recipe for target 'all' failed
    make: *** [all] Error 2
  • 解决方案
    Examples/ROS/ORB_SLAM2/CMakeLists.txt文件中添加编译信息-lboost_systema

    1
    2
    3
    4
    5
    6
    7
    8
    9
    	set(LIBS 
    ${OpenCV_LIBS}
    ${EIGEN3_LIBS}
    ${Pangolin_LIBRARIES}
    ${PROJECT_SOURCE_DIR}/../../../Thirdparty/DBoW2/lib/libDBoW2.so
    ${PROJECT_SOURCE_DIR}/../../../Thirdparty/g2o/lib/libg2o.so
    ${PROJECT_SOURCE_DIR}/../../../lib/libORB_SLAM2.so
    -lboost_systema ## 添加这一项
    )

    无法找到ros package 或者ros

  • 测试方式

    1
    2
    3
    4
    echo $ROS_ROOT
    /opt/ros/melodic/share/ros
    echo $ROS_PACKAGE_PATH
    /opt/ros/melodic/share:/home/test/slam/ORB_SLAM2-master/Examples/ROS/ORB_SLAM2
  • 解决方案

    用户目录的.bashrc中添加

    1
    2
    3
    4
    # 有顺序要求 添加ros_root path
    source /opt/ros/melodic/setup.bash
    # 添加ros_package_path
    export ROS_PACKAGE_PATH=${ROS_PACKAGE_PATH}:/home/test/slam/ORB_SLAM2-master/Examples/ROS/ORB_SLAM2

    应用添加的环境变量
    source ~/.bashrc

编译pongoline出错

https://github.com/raulmur/ORB_SLAM2/issues/22

  • 解决方案
    1
    2
    3
    4
    5
    6
    7
    8
    9
    10
    git clone https://github.com/stevenlovegrove/Pangolin.git
    cd Pangolin
    mkdir build
    cd build
    cmake -DCPP11_NO_BOOST=1 ..
    make -j1
    Then,
    cd ORB_SLAM2
    chmod +x build.sh
    ./build.sh

Resource not found: rgbd_launch

  • 解决方案
    1
    sudo apt-get install ros-melodic-rgbd-launch

海康威视监控使用html播放

存在的问题

  • rtsp
    无法直接在网页端播放,需要插件的支持。不考虑。
  • rtmp
    可以在网页播放,但是播放器需要flash的支持,chrome在2020年后对flash的支持十分不友好,但是延迟比较底。
  • hls
    可以在网页播放,也不需要插件和flash的支持,但是缺点在于hls将网页进行切片传输,每次切片都会造成时间的延迟,而且在网络不好的地方,视频会有克顿和无法播放的现象。

本文使用ffmpeg对网络镜头的视频流进行转码为hls,通过nginx进行代理,网页端通过hls.js显示网络镜头的画面。

ffmpeg转码为hls

通过ffmpeg将rtsp转码为hls,转码的输入为网络摄像机的子码流,视频和音频的解码直接使用镜头的解码编码器h264和acc。-hls_time 为 hls切片的时间间隔,时间越短则延迟越低,但是传输的带宽越大对服务器要求更高,-hls_list_size为.m3u8文件的长度,-hls_wrap为本地交换文件的大小。

1
2
3
4
5
6
7
8
start ffmpeg ^
-i rtsp://username:[email protected]/Streaming/Channels/102?transportmode=unicast ^
-c copy ^
-f hls ^
-hls_time 1.0 ^
-hls_list_size 2 ^
-hls_wrap 2 ^
C:/nginx-1.19.2/html/hls/test.m3u8

搭建nginx并配置

nginx.conf配置文件

1
2
3
4
5
6
7
8
9
10
11
12
13
14
15
16
17
18
19
20
21
22
23
24
25
26
27
28
29
30
31
32
33
34
35
36
37
38
39
40
41
42

#user nobody;
worker_processes 1;

#error_log logs/error.log;
#error_log logs/error.log notice;
#error_log logs/error.log info;

#pid logs/nginx.pid;


events {
worker_connections 1024;
}


http {
include mime.types;
default_type application/octet-stream;
# 跨域访问
add_header Access-Control-Allow-Origin *;
add_header Access-Control-Allow-Headers X-Requested-With;
add_header Access-Control-Allow-Methods GET,POST,OPTIONS;


#access_log logs/access.log main;

sendfile on;
keepalive_timeout 65;

server {
listen 80;

#charset koi8-r;

#access_log logs/host.access.log main;

location / {
root html;
index index.html index.htm;
}
}

前端视频显示

前端为了能够播放hls, 使用hls.js播放直播视频,hls.js不需要任何的播放器,可以直接在video元素上运行

https://www.npmjs.com/package/hls.js/v/canary

  • html

    1
    2
    3
    4
    5
    6
    7
    8
    9
    10
    11
    12
    13
    14
    15
    16
    17
    18
    19
    20
    21
    22
    23
    24
    25
    26
    27
    28
    29
    30
    31
    32
    33
    34
    35
    36
    <!DOCTYPE html>
    <html lang="en">

    <head>
    <meta charset="UTF-8">
    <meta name="viewport" content="width=device-width, initial-scale=1.0">
    <title>hls test</title>
    </head>

    <body>

    <h1>hls test</h1>
    <script src="https://cdn.jsdelivr.net/npm/hls.js@latest"></script>
    <video id="video"></video>
    <script>
    var video = document.getElementById('video');
    // 视频的路径
    var videoSrc = 'http://localhost/hls/test.m3u8';
    if (Hls.isSupported()) {
    var hls = new Hls();
    hls.loadSource(videoSrc);
    hls.attachMedia(video);
    hls.on(Hls.Events.MANIFEST_PARSED, function () {
    video.play();
    });
    }
    else if (video.canPlayType('application/vnd.apple.mpegurl')) {
    video.src = videoSrc;
    video.addEventListener('loadedmetadata', function () {
    video.play();
    });
    }
    </script>
    </body>

    </html>
  • vue

    1
    2
    3
    4
    5
    6
    7
    8
    9
    10
    11
    12
    13
    14
    15
    16
    17
    18
    19
    20
    21
    22
    23
    24
    25
    26
    27
    28
    29
    30
    <template>
    <div>
    <video ref="videoRef" height="500px" autoplay />
    </div>
    </template>

    <script>
    import Hls from 'hls.js'
    export default {
    data() {
    return {
    hls:''
    }
    },
    mounted: function() {
    const videoRef = this.$refs.videoRef
    const url = 'http://localhost/hls/test.m3u8'
    this.hls = new Hls();
    this.hls.loadSource(url)
    this.hls.attachMedia(this.$refs.videoRef)
    this.hls.on(Hls.Events.MANIFEST_PARSED, () => {
    console.log('加载成功');
    this.$refs.video.play();
    });
    this.hls.on(Hls.Events.ERROR, (event, data) => {
    console.log('加载失败');
    });
    }
    }
    </script>

最终显示效果

视频的延迟大概有3-4秒,对于实时性较高的应用还是达不到要求。


vmware使用主机代理

主机配置

主机的配置主要为了虚拟机可以使用主机的网络。

代理配置

通常使用ssr作为科学上网的工具,如果需要虚拟机使用代理,则需要打开ssr设置中的本地代理,并允许局域网的连接。
这样通过此端口的流量就可以通过ssr,流量的pac和代理规则也交付个ssr进行控制。
一般配置代理端口为1080端口

vmware 网络配置

vmware虚拟机使用Nat模式,这样相当于主机为一个路由器,可以给每个虚拟机分配ip地址。访问主机也就是访问网络的网关。

ubuntu配置

主要配置浏览器的访问和终端的访问

浏览器配置

通过设置setting-> network -> network Proxy
设置为Manual模式,使用http或socks代理,地址为主机的地址可以通过主机的ipconfig查看,一般为VMnet8网卡的地址。

端口号为主机设置的对应端口

终端配置

以上的代理配置仅限于浏览器的使用,对于终端的程序是没有用的。
通常的终端应用都可以通过自身的proxy代理配置,比如git, wget, apt.但是每个应用都得重新配置一次,为了方便的快捷的使用代理,在终端可以借助proxychains工具进行方便的代理访问。

https://github.com/haad/proxychains

在ubuntu中可以使用apt安装proxychains

1
sudo apt install proxychains

通过 /etc/proxychains.conf 配置代理

1
2
3
4
5
6
7
8
9
10
11
12
13
14
15
16
17
18
19
20
21
22
23
# ProxyList format
# type host port [user pass]
# (values separated by 'tab' or 'blank')
#
#
# Examples:
#
# socks5 192.168.67.78 1080 lamer secret
# http 192.168.89.3 8080 justu hidden
# socks4 192.168.1.49 1080
# http 192.168.39.93 8080
#
#
# proxy types: http, socks4, socks5
# ( auth types supported: "basic"-http "user/pass"-socks )
#
[ProxyList]
# add proxy here ...
# meanwile
# defaults set to "tor"
# 在最后添加配置文件
http 192.168.164.1 1080
socks5 192.168.1.123 1080

可能会出现找不到libproxychains.so.3

1
2
$ find /usr -name "libproxychains.so.3"
/usr/lib/x86_64-linux-gnu/libproxychains.so.3

将对应的路径添加到/usr/bin/proxychains中的LD_PRELOAD中。

usage example

1
2
3
4
sudo proxychains apt update

#proxychains ping google.com
# 这条命令不会起作用,因为proxychains只能代理TCP连接,ping命令通过ICMP协议作用

ubuntu18.04 安装librealsense并验证

安装环境

OS: Ubuntu 18.04 bionic
Kernel: x86_64 Linux 4.15.0-20-generic

测试通过了vmware station开启的虚拟机ubuntu18.04

安装Realsense SDK

参考https://github.com/IntelRealSense/librealsense/blob/master/doc/distribution_linux.md

以前的Librealsense需要编译进行安装,但是对于Ubuntu LTS kernels 4.4, 4.8, 4.10, 4.13, 4.15, 4.18* 5.0* 5.3*可以使用apt 直接进行安装。

建议使用科学上网进行安装,否则会下载很慢

1
2
3
4
5
6
7
8
9
10
11
# 注册public key
sudo apt-key adv --keyserver keys.gnupg.net --recv-key F6E65AC044F831AC80A06380C8B3A55A6F3EFCDE || sudo apt-key adv --keyserver hkp://keyserver.ubuntu.com:80 --recv-key F6E65AC044F831AC80A06380C8B3A55A6F3EFCDE

# 添加apt repository
sudo add-apt-repository "deb http://realsense-hw-public.s3.amazonaws.com/Debian/apt-repo bionic main" -u
# ubuntu 16可以换为
# sudo add-apt-repository "deb http://realsense-hw-public.s3.amazonaws.com/Debian/apt-repo xenial main" -u

# 安装librealsense
sudo apt-get install librealsense2-dkms
sudo apt-get install librealsense2-utils

验证是否安装成功

重新连接RealSense相机并运行realsense-viewer去验证是否安装成功

升级librealsense

1
2
sudo apt-get update
sudo apt-get upgrade

卸载librealsense

1
2
# 卸载所有的realsense相关的安装包
dpkg -l | grep "realsense" | cut -d " " -f 3 | xargs sudo dpkg --purge

相关安装包的内容和依赖

Name Content Depends on
librealsense2-udev-rules Configures RealSense device permissions on kernel level -
librealsense2-dkms DKMS package for Depth cameras-specific kernel extensions librealsense2-udev-rules
librealsense2 RealSense™ SDK runtime (.so) and configuration files librealsense2-udev-rules
librealsense2-utils Demos and tools available as a part of RealSense™ SDK librealsense2
librealsense2-dev Header files and symbolic link for developers librealsense2
librealsense2-dbg Debug symbols for developers librealsense2

可以按照需求进行安装